Secure access to local workloads from Cloud Workers and Lambda functions
This guide describes a general-purpose pattern for securely connecting Cloud Systems that cannot run Enclave (such as AWS Lambda, Azure Functions, Fargate, or other SaaS tools) to local on-premise resources, including internal servers, applications, databases and mainframes, or resources in other cloud provider networks.
The pattern uses the open-source HAProxy project, alongside an Enclave network, typically deployed as a lightweight and standalone VM, that sits in the same network as the Cloud workload. HAProxy accepts requests from the Cloud workload and proxies the traffic across the Enclave Network Fabric, which then securely delivers it to the destination host(s) via one or more Enclave Gateway(s).
When to use this pattern
This approach is useful whenever you need to enable access to internal or protected services, and the client system:
- Cannot install Enclave, due to platform restrictions (e.g. Lambda, Functions, etc.)
- Should not install Enclave, due to security or policy constraints
- Is ephemeral, stateless, or event-driven
- Needs TCP-based access to an Enclave-routed destination
Common use cases:
- AWS Lambda functions that need to invoke or query an on-premise backend
- Azure Logic Apps triggering APIs (e.g. SAP APIs)
- Scheduled tasks remotely accessing on-premise databases
How it works
The architecture involves three components:
- A restricted client (e.g. a Lambda function)
- A cloud-hosted Enclave proxy (e.g. EC2 instance or container)
- An Enclave Gateway in front of the destination resource
The restricted client connects to the HAProxy instance using standard internal networking. The proxy relays the connection through enclave tunnel to the on-premise Enclave Gateway, which forwards it to the internal target or targets.
Tip
If you need to access on-premise resources from GitHub Actions, you may configure your build to include Enclave, so that GitHub Actions can connect to resources in your Enclave network. Use this action: enclave-networks/setup-enclave
Example architecture
Connecting AWS Lambda functions to an on-premise IBM Mainframe
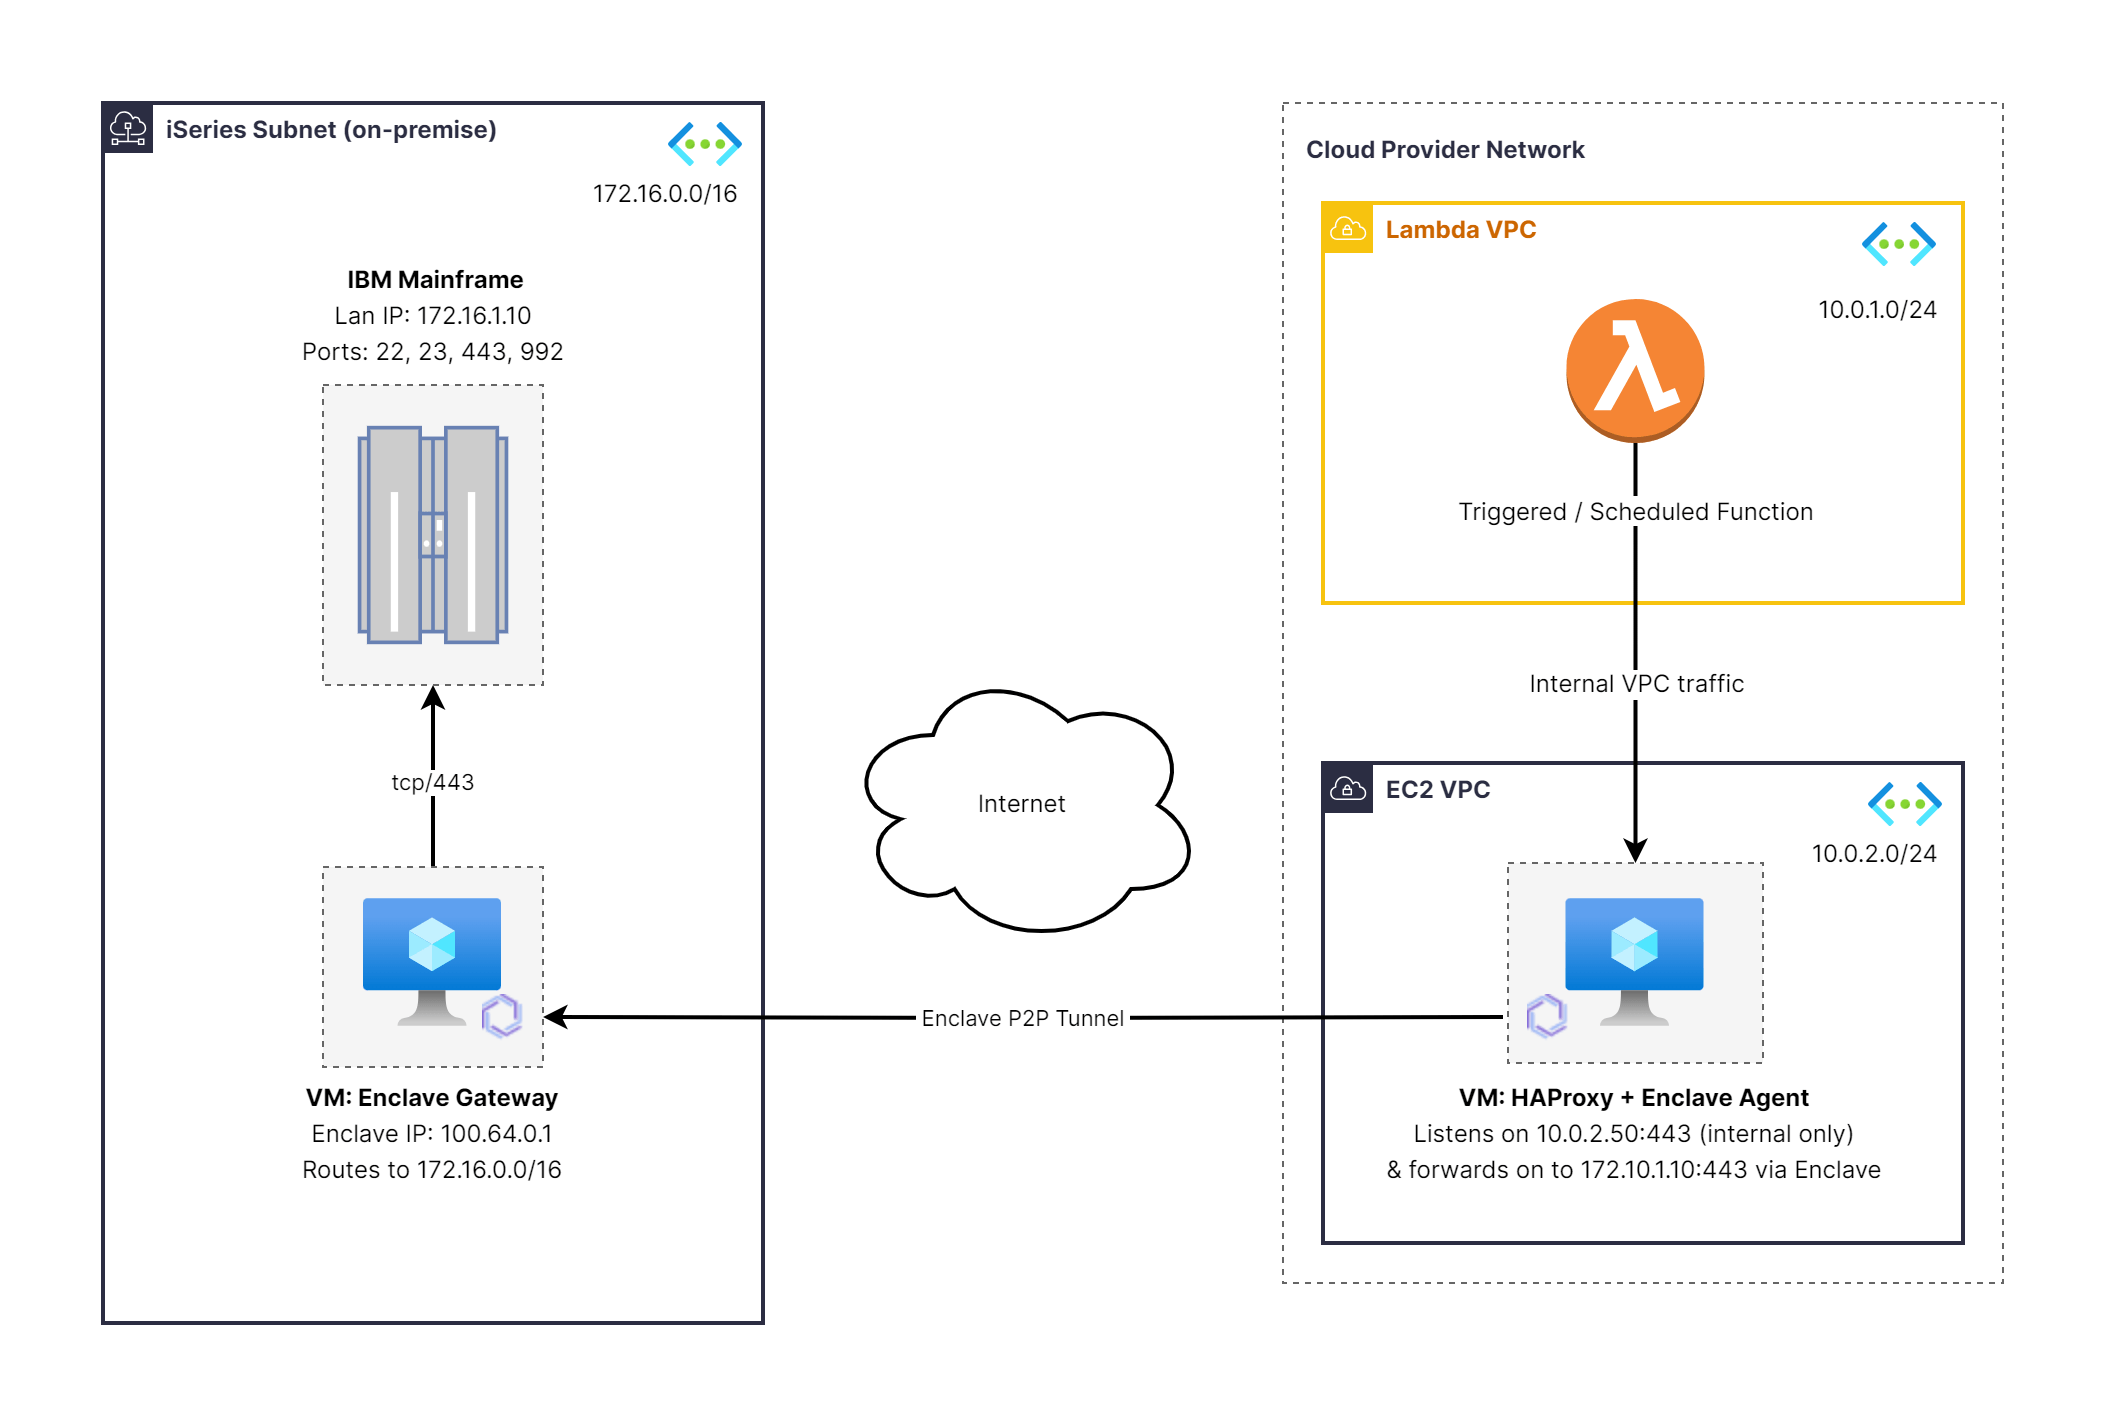
This example illustrates how to connect a cloud-native serverless function, in this case an AWS Lambda, to an on-premise system that resides deep within a private network. The target is an IBM mainframe that cannot be directly exposed to the Internet. By routing the connection through an Enclave-connected proxy in the Cloud, and then over a secure Enclave tunnel to an on-prem Enclave Gateway, the Lambda can safely reach the mainframe without any public exposure or changes to the mainframe itself.
In this example:
-
Our Lambda function runs inside
10.0.1.0/24. We will setup a dedicated VM to act as our proxy instance at10.0.2.50. This becomes the "front door" for the Lambda function to reach the on-premise IBM mainframe. -
We have an Enclave Gateway in our on-premise environment. It is configured to provide a route to the
172.16.0.0/16subnet, in which the IBM mainframe can be reached at172.16.1.10:443. This routing is outbound-only: the Gateway can receive traffic from Enclave-enabled clients, but cannot initiate connections to them. -
We will create a new network pathway using Enclave and HAProxy that allows the Lambda function to safely reach out to the IBM mainframe.
Once setup, the Lambda function may connect to the new VM (running Enclave and HAProxy, listening on 10.0.2.50:443, in this example), which then uses the Enclave tunnel to relay the traffic to the on-prem Enclave Gateway, which in turn forwards it safely on to the IBM mainframe (at 172.16.1.10:443).
In all Enclave reference architecture diagrams, the presence of the Enclave logo ( ![]() ) against a device indicates it is running the Enclave agent.
) against a device indicates it is running the Enclave agent.
Implementation steps
1. Provision the Proxy host
Deploy a Linux VM (e.g. EC2 in AWS) inside a subnet that your client (e.g. Lambda) can reach using internal VPC traffic only. You will need to install Docker, and ensure the VM has outbound internet access for Enclave connectivity.
2. Configure Docker stack
To keep the deployment lightweight, portable and immutable, we’ll run both the Enclave Agent and HAProxy as Docker containers. This allows us to define all configuration in a single directory with a few files. The containers will run side-by-side, sharing a common network stack (in this example, network_mode: host), and require no additional system-level dependencies beyond Docker itself.
Here's what the files in our project directory will look like:
project-directory/
├── docker-compose.yml      # Defines and runs the Docker Compose stack, including HAProxy and Enclave containers
├── haproxy.cfg             # Contains the configuration file for HAProxy
└── .env                    # Contains the Enclave Enrolment Key, and any other secrets you need to add
haproxy.cfg
This file configures HAProxy to forward inbound TCP traffic from port 443 to one or more backend servers reachable over the Enclave mesh — in this case, an on-premise system at 172.16.1.10:443. Pay particular attention to:
-
The
frontendsection, which binds to*:443, exposing the entry point. -
The
backendsection, which targets the Enclave-routed private IP. -
The
listen statsblock, which exposes a read-only monitoring interface on*:8404. You can access it via browser (e.g. http://localhost:8404) using the credentialsadmin:readonlypass.
This configuration can be extended with additional backend servers for load-balancing or failover if needed.
global
  daemon
  maxconn 256

defaults
  mode tcp
  timeout connect 5s
  timeout client 30s
  timeout server 30s

# HTTPS forwarding
frontend https_frontend
  bind *:443
  default_backend https_backends

backend https_backends
  option tcp-check
  balance roundrobin
  server s1 172.16.1.10:443 check
# Add additional servers here to enable load-balancing across multiple back-end hosts
#  server s2 172.16.1.20:443 check
#  server s3 172.16.1.30:443 check

# HAProxy statistics interface
listen stats
  bind *:8404
  mode http
  stats enable
  stats uri /
  stats refresh 10s
  stats show-node
  stats show-desc HAProxy\ TCP\ Forwarder
  stats auth admin:readonlypass
docker-compose.yml
This runs Enclave and HAProxy in the same network namespace, allowing HAProxy to forward traffic over the Enclave tunnel.
This file defines and launches the two-container stack using Docker Compose:
-
The haproxy container handles TCP forwarding and statistics reporting.
-
The enclave container shares its network namespace with HAProxy to provide direct access to the tunnel.
Pay attention to:
-
network_mode: hoston the HAProxy container, which allows the system to bind directly to ports like443and8404on the host. -
network_mode: 'service:haproxy'on the Enclave container, ensuring both containers share a single network context. -
The
cap_add,devices, andvolumesused to enable Enclave to manage networking and persist configuration.
services:
  haproxy:
    image: haproxy:alpine
    restart: unless-stopped
    volumes:
      - ./haproxy.cfg:/usr/local/etc/haproxy/haproxy.cfg:ro
    network_mode: host

  enclave:
    image: enclavenetworks/enclave:latest
    restart: unless-stopped
    volumes:
      - enclave-config:/etc/enclave
      - enclave-logs:/var/log/enclave
    cap_add:
      - NET_ADMIN
    devices:
      - /dev/net/tun
    network_mode: 'service:haproxy'
    healthcheck:
      test: ["CMD", "enclave", "waitfor", "discover.enclave.io", "-t", "2"]
      interval: 1m
      timeout: 3s
      retries: 2
      start_interval: 5s
      start_period: 1m
    environment:
      ENCLAVE_ENROLMENT_KEY: ${ENCLAVE_ENROLMENT_KEY}

volumes:
  enclave-config:
  enclave-logs:
.env
This file holds sensitive or environment-specific configuration — primarily the Enclave enrolment key. This value enrols the container to your organisation each time the container starts, so it's best to use an Ephemeral Enrolment Key here.
-
Ensure this file is present in the same directory as
docker-compose.yml -
Ensure it is excluded from version control (e.g. via .gitignore)
-
Properly protected, as it grants enrolment into your Enclave environment
You'll need to obtain a valid enrolment key from the Enclave Portal to replace the XXXXX-XXXXX-XXXXX-XXXXX-XXXXX placeholder.
ENCLAVE_ENROLMENT_KEY=XXXXX-XXXXX-XXXXX-XXXXX-XXXXX
3. Provision an Enrolment Key
You will need to create an Enrolment Key to give the new cloud VM running Enclave (and the HAProxy) access to your tenant, and to the on-premise Enclave Gateway.
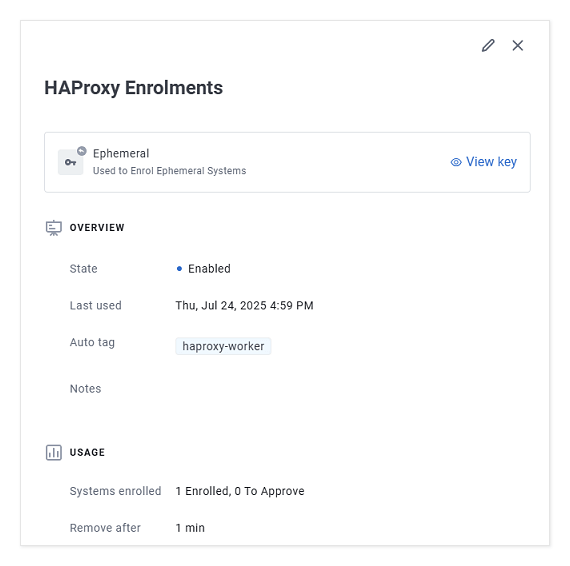
Ephemeral Enrolment Keys are used for enrolling containers, Kubernetes pods and other Systems that are temporary, short-lived or automatically provisioned. Systems enrolled using these keys are automatically removed from your Enclave Organisation when they stop/disconnect.
You can't change the approval mode for Ephemeral Enrolment Keys, nor can you set a use limit, as you can for General Purpose Enrolment Keys. Ephemeral Enrolment Keys are designed for repeated and automatic provisioning, so systems are automatically approved, and there is no limit on how many can be enrolled.
Here we named our enrolment key, "HAProxy Enrolments", and set it to automatically assign a tag named haproxy-worker to any system that enrols using this key. We've also set Enclave to automatically remove containers from the tenant if they're disconnected for more than 1 minute, but you should consider what is most suitable for your environment and use.
Each time the containers restart, this Enrolment Key will be used again to re-enrol the new container instance.
4. Configure Enclave Policy
In our example, the on-premise Enclave Gateway is an already enrolled, and named enclave-gateway. This system has already been enabled to act as a Gateway for the 172.16.0.0/16 subnet (in which the IBM mainframe resides at 172.16.1.10:443). Ensure that your Gateway is setup appropriately and allowed to act as a pathway to your on-prem workload subnet or subnets.

Lastly, take care to ensure there is a Gateway Access Policy to bring this all together. Here our policy is named "HAProxy Worker to IBM Mainframe Subnet" and on the left-hand side of the policy we attach the tag haproxy-worker, and the right-hand side of the policy presents the route to 172.16.0.0/16 via the enclave-gateway host.
Note that you may wish to apply subnet filtering in your environment, rather than allowing the policy to grant access to the whole subnet enabled on the system, you may consider using the policy to restrict the scope of the access. In this example, we might add a subnet filtered rule to clamp access to only 172.16.1.10/32.

5. Deploy and test
Start the Docker container stack online: sudo docker compose up -d
    $ sudo docker compose up -d
    [+] Running 2/2
    ✔ Container forwarding-haproxy-1                      Started                                                          0.3s
    ✔ Container forwarding-enclave-1                      Started                                                          0.4s
Once the docker containers are running, you can check that Enclave is successfully setup:
$ docker exec forwarding-enclave-1 enclave status
You should expect to see a connected system in the status output advertising a route into the IBM mainframe subnet, like this:
   ...

   Gateway for . . . . : 172.16.0.0/16
   Dns . . . . . . . . : ...
   Policy. . . . . . . : HAProxy Worker to IBM Mainframe Subnet
                       :   Gateway Details
                       :     Allow [any] from local -> peer
                       :     Subnets 172.16.0.0/16
To check that Enclave is able to successfully forward traffic from the Cloud VPC network back to the IBM mainframe (assuming the policy allows it, and your IBM mainframe responds to ICMP echo requests), you should be able to ping it from inside the Enclave docker container:
docker exec forwarding-enclave-1 ping 172.16.1.10
PING 172.16.1.10 (172.16.1.10) 56(84) bytes of data.
64 bytes from 172.16.1.10: icmp_seq=1 ttl=64 time=63.2 ms
64 bytes from 172.16.1.10: icmp_seq=2 ttl=64 time=60.3 ms
64 bytes from 172.16.1.10: icmp_seq=3 ttl=64 time=66.4 ms
...
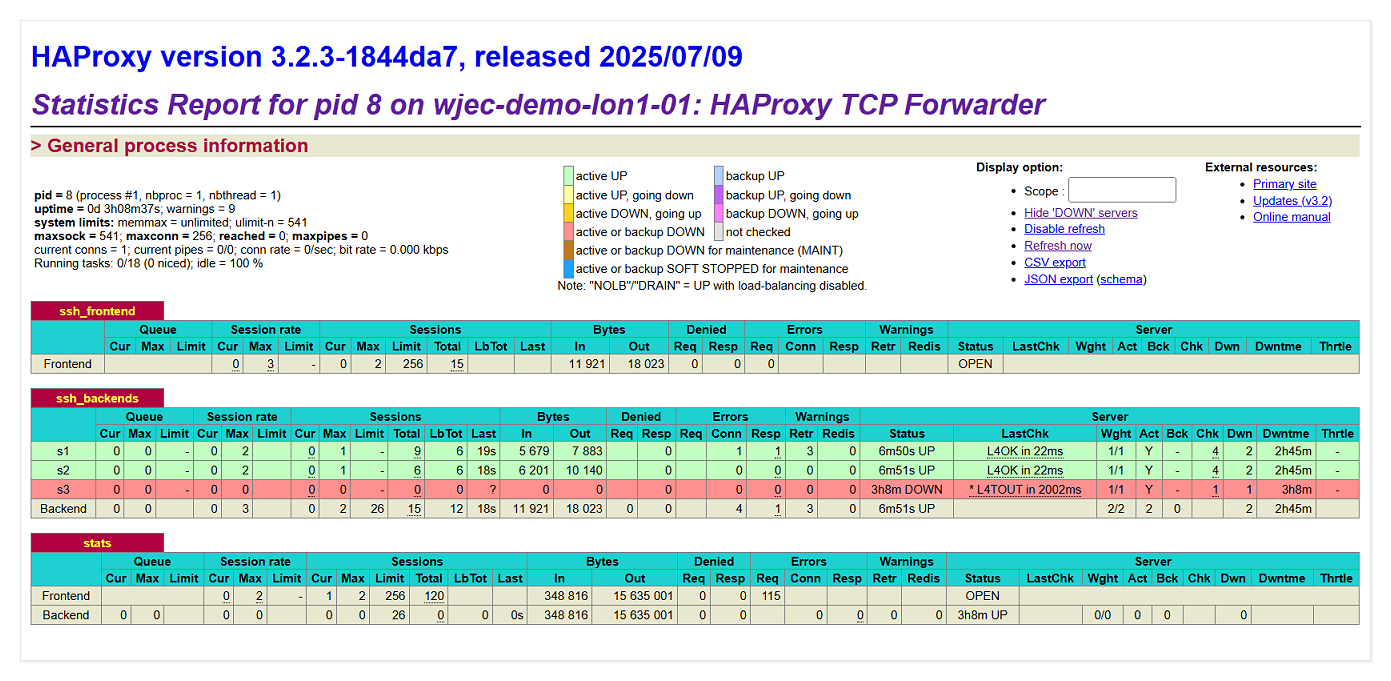
The next thing to check is the HAProxy status page in your browser on port :8404. You could use Enclave here, or the public or local IP address of the server - depending on what's available to you - (e.g. http://123.123.123.123:8404/)
In the example we've included below, you can see we've purposefully setup HAProxy to route traffic to three servers on the LAN. Two are real and working (s1 and s2), and s3 is a fictitious host that doesn't exist. As you can see, HAProxy has marked backend host s3 as red, because it hasn't passed the Layer 4 health-check probes.
You'll notice that if you disable the Enclave Policy, or stop Enclave on the Gateway, HAProxy will mark the LAN servers red and inaccessible as they'll start failing the healthchecks, so this is a good place to assess the overall health of the traffic forwarding pathway.
Congratulations! You're ready to start forwarding traffic.
You can also test the HAProxy endpoint directly from the Cloud VM. Run curl on the Cloud VM curl https://localhost:443 to hit the IBM mainframe on 172.16.1.10:443 and see the result, or configure your Lambda functions to start accessing the webserver on the IBM mainframe by connecting to the LAN IP (via internal VPC traffic pathways) of the new Cloud VM on 10.0.2.50:443
Other uses
This pattern applies broadly to scenarios where the client:
-
Is event-driven, serverless, or platform-constrained
-
Needs TCP access to Enclave-routed resources
-
Cannot run Enclave or third-party software, e.g. is Agentless
Additional scenarios include:
-
Azure Functions accessing an on-prem REST API
-
CI/CD pipelines deploying to private Kubernetes clusters
-
SaaS RMM tools reaching customer infrastructure through Enclave
Conclusion
This architecture allows you to extend secure Enclave access to systems that cannot run the agent directly. By deploying a lightweight, Enclave-connected proxy, you can bridge the gap between cloud-native workloads and internal systems — with no public exposure and full policy control. The Lambda function to an IBM mainframe presented in this example is one of many possible applications of this pattern.
Keywords: Connect Cloud to on-premise systems, access internal systems from cloud, call private services from lambda functions, cloud function access to internal network, connect serverless to private backend, access mainframe from AWS, integrate cloud apps with on-prem systems, access private APIs from cloud services
Last updated July 24, 2025