Deploying an Enclave Gateway in WSL
In order to run an Enclave Gateway, Enclave must be installed onto a Linux operating system. We recommend installing Enclave directly onto either a physical, or virtual machine wherever possible.
However, in some scenarios customers may not have easy access to Linux hosts. In such cases, the Windows Subsystem for Linux (WSL) allows Linux distributions to be hosted directly from within Windows using a concept known as nested virtualisation (running a VM inside a VM).
WSL and nested virtualisation enable organisations which don't, or can't, run Linux servers to avoid the overhead of provisioning additional dedicated resources in order to run an Enclave Gateway. However, there are limitations to be aware of when deploying an Enclave Gateway inside WSL.
Limitations
When running Enclave inside WSL there are two limitations to be aware of:
-
Nested virtualisation introduces an additional layer of abstraction, which can lead to reduced compute performance compared to native virtualisation, which can negatively affect throughput.
-
By default, WSL uses a type of Network Address Translation (NAT) which prevents Enclave from establishing peer-to-peer connections, also causing reduced network performance as traffic passes instead through relay servers.
As a result, we don't recommend running an Enclave Gateway inside WSL due to the complication introduced by nested virtualisation and WSL NAT, unless no other alternatives are available.
If you decide to run an Enclave Gateway using nested virtualisation, this guide will help you achieve the best performance for your Gateway.
The following steps show you how to enable port forwarding and force an Enclave Gateway to run on a fixed port number as a work-around to enable direct peer-to-peer connections. However, please note that the Enclave Gateway in WSL will only support TCP connections, which may still result in reduced network performance compared to native virtualisation, or no virtualisation at all.
Installation
-
Install WSL. We recommend installing the Ubuntu distribution, which we've used for this guide. Once installed, you can start WSL by running
wslin the windows terminal. -
Enable systemd in the WSL instance; follow the guide in the Microsoft documentation.
-
Install Enclave and enrol a new system within WSL. Follow our Getting Started guide if you're unfamiliar with the process.
-
Find the IP address allocated to your WSL instance by running the following command inside your WSL instance:
ip addr | grep eth0In the example below, the WSL instance has been allocated the IP address
182.18.144.139(underlined) inside a/20subnet.
Warning
The WSL subnet is allocated randomly, and there is no guarantee that the subnet allocated to you will be equal to the value underlined above.
-
Enable port forwarding to the WSL instance by running the following
netshcommand on the Windows host machine. In this example we're going to randomly use port59724from the ephemeral port range, but you may wish to change the port according to your own requirements.Important: Replace
[ipaddr]in this command with the IP address obtained in step 3.netsh interface portproxy add v4tov4 listenaddress=0.0.0.0 listenport=59724 connectport=59724 connectaddress=[ipaddr] -
Open the Windows Firewall by running the following
netshcommand on the Windows host machine.netsh advfirewall firewall add rule name="Enclave WSL2" dir=in action=allow protocol=TCP localport=59724 -
Normally Enclave selects a random port number to use each time it's started, but you'll need to fix Enclave to use the same port number you've forwarded to WSL on the Windows host. You can force Enclave to use a fixed port number by running the following command inside your WSL instance:
enclave set-config localport 59724You may need to restart Enclave for the change to take effect. If you’re prompted to restart Enclave, do so.
Tip
If you're using multiple profiles, you can use the
--profileargument to specify which profile Enclave should configure. For example:enclave set-config localport 59724 --profile Universe -
You can confirm that Enclave is using the new fixed port by running the following command inside your WSL instance:
enclave statusThe port number in the
Binding addressshould match the value you chose for port forwarding, which is59724if you've use the same port number we did in this guide.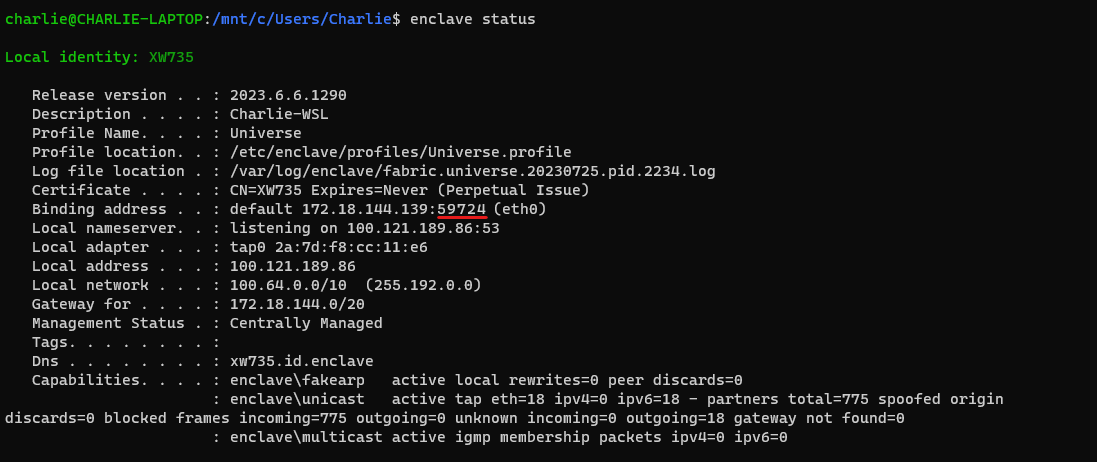
-
If you've not already enabled your WSL instance of Enclave to act as an Enclave Gateway, you can follow our guide to Enabling Enclave Gateway.
-
Optionally, you can check that connections to the Enclave Gateway are using the specified port number by running the following command inside your WSL instance:
sudo netstat -tupn | grep enclaveIf the Enclave Gateway is configured correctly, the
netstatoutput will confirm that all Enclave partner systems are connected using the specified port number, as expected:
Having problems? Contact us at support@enclave.io or get help and advice in our community support channels.
Last updated August 1, 2023