Deployment
Enclave Gateways are typically deployed as self-hosted, self-managed instances, where administrators setup the hardware, network, and operating system, install Enclave, and enrol those systems into their tenant organisation before enabling them to act as a Gateway. However, two other deployment models are also available: managed and co-managed.

Managed
When Enclave Gateway is deployed as a managed solution, Enclave will host and manage a pair of systems enrolled to your organisation tenant configured to act as Gateways. Each enrolled Gateway is hosted on individual dedicated physical hardware in a UK data center located in Gloucester, UK. Each Managed Gateway is multi-tenanted on hardware and static public IP addresses shared with other customers.
Limitations
Managed Gateways are hosted on Enclave-owned hardware co-located in the United Kingdom, making this solution unsuitable for accessing devices in your organisation's private subnets. Instead, Managed Gateways are mainly used for routing traffic to the public internet subject to DNS and malware filtering, or for providing consistent access to SaaS services from known static public IP addresses.
Technical specification
-
The Managed Gateway solution is deployed as pair of active-passive Gateways on separate physical hardware with automatic failover for high-availability and resilience to single point of failure.
-
Each Managed Gateway instance runs on a dedicated physical server runs an Intel E3-1230 V6 processor and is connected to the Internet with diverse, unmetered 1Gb links.
-
Each Managed Gateway instance includes DNS and malware filtering by way of integration with the open-source Pi-Hole project.
-
Although fully managed, we provide only best-effort recovery in the event of failures or unexpected outages, without formal service level agreements (SLAs). Our co-location service partner offers 99.9% uptime SLA on the underlying hardware and bearer network. Managed services are delivered in accordance with the terms outlined in our Customer Agreement, governing the scope and conditions of service.
Co-managed
The co-managed deployment model is a shared responsibility model, designed for customers with limited experience managing Linux in production.
When Enclave Gateway is deployed as a co-managed solution, Enclave will manage the initial setup and installation of Enclave Gateway on customer-hosted hardware, as well as provide best-effort, "hands-on" support to assist the customer in maintaining consistent service delivery.
Limitations
Co-managed Gateways are only available to customers who have purchased Priority support on an annual billing term.
Technical specification
-
The customer will host and provision appropriate hardware and bearer network connectivity for the Gateway(s) and install the relevant operating system.
-
The Enclave support team will only provide co-managed assistance for dedicated, change-controlled environments. Multi-purpose operating system deployments will not be supported.
-
The Enclave support team will request transient, just-in-time SSH access for initial setup which will include preparing the operating system to automatically apply security patches, deploying Enclave, enrolling to the tenant organisation and configuring templated Policies and Tags.
-
The deployment may optionally includes DNS and malware filtering capabilities by way of integration with the open-source Pi-Hole project.
-
The customer is responsible for hardware, network availability, bandwidth charges and any other costs incurred from Gateway operating co-managed Gateway(s).
-
Co-managed support includes only issues directly related to the deployment, configuration, and operation of Enclave software and services, including assistance with installations, troubleshooting connectivity, and addressing software-related performance issues. We also offer guidance on best practices for using Enclave features, but any other issues, including those related to third-party services, system administration, or general device maintenance, are outside the scope of co-managed support. Co-managed services are delivered in accordance with the terms outlined in our Customer Agreement, governing the scope and conditions of service.
Self-hosted
Before you begin this guide to deploying a self-hosted Enclave Gateway, you’ll need an Enclave account set up with at least two devices enrolled. Read our quick start guide if you need help with this.
Customers can enable any enrolled Linux or WSL system running Enclave to act as an Enclave Gateway. The rest of this guide describes how customers can deploy self-hosted Enclave Gateways. Be sure to familiarise yourself with the requirements and limitations set out below for operating self-hosted Gateways.
Resource requirements
Gateways are devices running any of our supported Linux distributions, with the Enclave Agent installed. This could be a VM, a Raspberry Pi, a mini-PC or any other system that can run Linux.
Tip
If you cannot deploy a Linux VM or Linux-compatible device, Enclave can run as a gateway inside WSL2 on a Windows Server.
WSL2 runs as a form of VM within Windows, so the server in question must have virtualisation enabled.
If running the host server itself as a VM, nested virtualisation must be available on your hypervisor. If running this VM in Azure, check the Azure Compute Unit documentation for details on which VM sizes support nested virtualisation.
The resource requirements of an Enclave Gateway are highly dependent on traffic volumes, number of users and execution environment. It's very hard for us to prescribe exactly the minimum requirements of your Enclave Gateway (not least because Enclave can run in very low-resource environments if required), so we highly recommend trialling your use-case on a small VM, and increase the size of the VM used for the gateway once you notice continuous high CPU usage.
However, there are a few rules that you can use when guiding your thinking about how much resource your gateway may need.
-
The amount of network traffic moving through the gateway has a much bigger impact on the resources required than the number of users; you may find that 500 users connecting to (for example) an Active Directory server and a file share for intermittent use will run on a single vCPU and 1GB of RAM, whereas those same users all continuously streaming HD video 24/7 through the gateway may need 4 load-balanced gateways with 4vCPUs but still 1GB of RAM each.
-
When deploying multiple Enclave Gateways for load-balancing/performance, connections are split randomly between the deployed gateways on a per-client basis. That is, all the traffic for a single client device will flow through a single gateway. Use the formula
(number_of_users / number_of_gateways) * average_bandwidth_per_userto calculate the average bandwidth each gateway will have to handle. -
An insufficiently-resourced or overloaded gateway will likely exhibit traffic slowdown / throttling evenly across all the users connected to it, coupled with high CPU usage on the gateway.
-
In a high-availability scenario, if a single gateway falls over, all traffic to that gateway will automatically switch over to one of the remaining gateways available. Consider whether you want each gateway to be able to comfortably handle the entirety of the total bandwidth in each case for an uninterrupted user experience (in which case each gateway will need spare resource sufficient to handle the failure of another gateway), or whether temporarily reduced overall performance is acceptable until the failed gateway is recovered.
Limitations
In order to enable an enrolled system to act as an Enclave Gateway, Enclave must be installed onto a Linux operating system. An Enclave Gateway is just a normal installation of Enclave which has been set as "Allowed to act as a Gateway" in the Portal. The following steps will show you how to configure an Enclave Gateway and configure Policies which will allow other Enclave systems to use it.
Installation
Step 1: Install and enrol
To get started, download and install Enclave onto the System which you want to use as an Enclave Gateway, provide an enrolment key and join it to your account. We support a variety of Linux distros.
Step 2: Enable the gateway
Once enrolled, you’ll need to "Allow the system to act as a Gateway" in the Portal. To do this, log into the Enclave Portal and open the Systems page. Find your enrolled system in the list and click on it to open the details pane.
Next, edit the system using the edit pen icon ( ), find the “Allow this system to act as a gateway” section and switch the toggle to enable this system to act as a Gateway.

Once enabled, Enclave will automatically configure that system to act as a gateway.
Info
When a system is enabled to act as a gateway the Enclave agent running on that system will automatically enable IP forwarding in the Linux kernel and create an iptables chain named ENCLAVE to hold the relevant source NAT rules.
Step 3: Configure subnets
An Enclave Gateway can act as a route to one or more subnets for other Enclave peers. It might provide access to a single subnet, for example to its local 192.168.1.0/24 network, or the Enclave Gateway may be running in AWS or Azure and provide access to a number of subnets. You may even decide to route all traffic for the entire Internet via your Enclave Gateway by configuring it to advertise a default route (0.0.0.0/0).
Enclave needs to know which subnets can be accessed via the new gateway. For convenience, Enclave will auto-discover all local ethernet or wireless network interfaces on the new gateway with IPv4 unicast addresses and automatically show them in the Portal (where the adapters are up and their assigned IP addresses are not broadcast, multicast or auto-configured addresses).
In the example below, Enclave has discovered there is a network interface with an IP address in the subnet 172.19.64.0/20 on this system. That means this system can be used as a gateway to access other devices not running Enclave in that subnet.

Against each subnet, you can optionally specify a subnet name. This name will be displayed when using the subnet in a Gateway Access Policy, making it easier to understand which subnet is being referred to.
It’s important to note that on this screen the administrator is defining all of the possible subnets available via this gateway, but not actually determining which systems can (or cannot) route traffic to those subnets. Controlling which Systems can reach which subnets behind specific Enclave Gateways is done later by creating one or more Gateway Access Policies. Use the ( ) button to remove any unwanted subnets from the gateway's configuration.
In some scenarios, you may want an Enclave Gateway to forward traffic towards a subnet it can reach but is not directly connected to (like 0.0.0.0/0). In these situations, use the "Add subnet" link to manually define additional subnets that this gateway is capable of routing traffic into.
Subnet discovery
As mentioned, Enclave will auto-discover all local Ethernet or wireless network interfaces on the new gateway with IPv4 unicast addresses and automatically show them in the Portal.
When the auto-discovered subnets are available — either because the adapters are up and their assigned IP addresses are not broadcast, multicast, or auto-configured IP addresses — each available subnet is shown with a green icon, indicating it is available for use.

If one of the auto-discovered subnets becomes unavailable after the point of auto-discovery, for example due to IP aliasing, re-configuration, or unplugging, Enclave will remember that the subnet was previously available and flag it as unavailable in the Portal with an amber warning icon, as shown below:

Info
Changes to network adapters and subnet availability are reflected in near real-time in the Portal. If you accidentally remove an auto-discovered subnet, use the Rediscover local subnets link in the edit pane to refresh the list and re-populate any missing subnets.
Please note that when custom subnets are defined that are not assigned to local network interfaces, Enclave will not attempt to determine the viability of the subnet. For example, if an Administrator defines a subnet of 0.0.0.0/0, Enclave will not attempt to determine if it is actually available on a specific interface nor display status indicators.
Subnet priority
When adding a subnet to a gateway, you can choose whether the gateway is a preferred route to the given subnet. For example, if you have two gateways that can both reach a given subnet (perhaps over an underlying global network), but one of the gateways is known to be a more efficient route to the specified subnet, you can indicate it has a Preferred priority level:
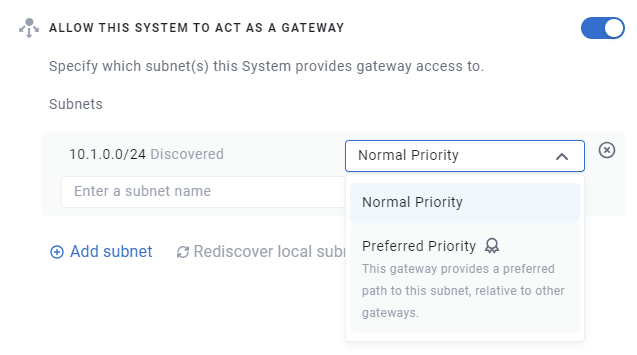
By default, gateway policies will use 'preferred' gateways first, and then fall back to other gateways if no preferred gateways is unavailable. Gateway selection can be further controlled by using the Gateway Priority setting when creating a Gateway Access Policy.
Step 4: Create an access policy
Now you have one or more configured Enclave Gateways, create one or more Gateway Access Policies to determine which of your enrolled systems can route traffic to which subnets.
Gateway Access Policies use Tags in exactly the same way as Direct Access Policies, but only on the sender side of the policy. Each policy enables connectivity between tagged systems and destination subnets via one or more selected gateways. Traffic can flow from Senders to destination IP addresses (subject to policy-based access controls), but devices on the routed subnets cannot initiate connectivity back to the sender systems.
In practice, this means that if you use Enclave together with Enclave Gateways to route traffic to webcams or printers (for example), any tagged Enclave systems will be able to send traffic to those devices, but those devices won’t be able to send unsolicited traffic back to the Systems inside your Enclave network.
To create a Gateway Access Policy select one or more Tags on the Senders side of the policy and select one or more subnets on the Gateway / Subnet side of the policy.
Once a policy is created, Enclave automatically configures the routing table for appropriate sender systems according to Tag membership and Trust Requirements.

Tip
Subnets can be large. In some situations, you may not want to provide access to an entire subnet and instead prefer to allow partial access to a smaller set of IP addresses, devices or systems in each subnet. In such cases, see the Subnet Filtering section.
Testing the gateway
Check that you can ping your new Enclave Gateway from your Sender policy machine, using the Enclave Gateway's Enclave Virtual address (i.e. 100.64.69.156 in the example below). You can find the Enclave Virtual address of your Enclave Gateway by running enclave status on either system once connected by policy.
You should also notice in the output of the enclave status CLI command on the sender-side systems that any routes advertised via your Enclave Gateway are listed under the appropriate peer, as shown below under Gateway for for the Menlo Park Office peer.
Peer: WZL94 (Menlo Park Office)

   Peer state. . . . . : Up
   Certificate . . . . : CN=WZL94 Expires=Never (Perpetual Issue)
   Endpoint. . . . . . : Udp/10.1.10.115:40161
   Last activity . . . : 0.75 seconds ago
   Transfer. . . . . . : 3.462 KB received, 4.071 KB sent, link rtt 0.59 ms
   Virtual network . . : 100.64.0.0/10 (255.192.0.0)
   Virtual address . . : 100.64.0.70
   Gateway for . . . . : 172.26.0.0/20
   Dns . . . . . . . . : wzl94.id.enclave, ubuntu-dev.enclave
   ACLs. . . . . . . . : allow [icmp] from peer -> local, allow [any] from local -> peer
If you can ping the Enclave Gateway (i.e. ping 100.64.0.70 in this example) via Enclave and your local system is showing 172.26.0.0/20 (or your equivalent subnet) as the Gateway for in CLI output for the correct peer, you should be able to start sending traffic directly to non-Enclave devices that subnet.
Knowing that the Enclave Gateway itself is reachable, try sending some traffic past the Enclave Gateway to a device in the subnet behind it. If the any of the host-based firewalls on the target systems not running Enclave allow it, you may be able to send pings to test end-to-end connectivity.
In the example below, we've successfully sent a ping from a Windows laptop in a coffee shop, via the Enclave Gateway at 100.64.0.70 in the office, out to a printer with an IP address of 172.26.0.250 in the Gateway's local subnet.
C:\> ping 172.26.0.250

Pinging 172.26.0.250 with 32 bytes of data:
Reply from 172.26.0.250: bytes=32 time=29ms TTL=64
Reply from 172.26.0.250: bytes=32 time=30ms TTL=64
Reply from 172.26.0.250: bytes=32 time=29ms TTL=64
Reply from 172.26.0.250: bytes=32 time=38ms TTL=64

Ping statistics for 172.26.0.250:
    Packets: Sent = 4, Received = 4, Lost = 0 (0% loss),
Approximate round trip times in milli-seconds:
    Minimum = 29ms, Maximum = 38ms, Average = 31ms
Troubleshooting
If you find an Enclave Gateway isn't working as expected, please see the Gateway section of our troubleshooting guide.
Having problems? Contact us at support@enclave.io or get help and advice in our community support channels.
Last updated December 23, 2025